Creating pages is one of the first steps in setting up your website and something you will do frequently; the steps below give you all the options available. The only required options are those noted with a red asterisk *.
CREATE A PAGE
Navigate to: Content > Add Content > Page
There are several available fields for you to utilize to create the content of your page:
-
Title*: This text will be used in 3 places:
-
The title displayed in your browser window
-
The header on your published page
-
It will also be used to construct the actual URL of the page
-
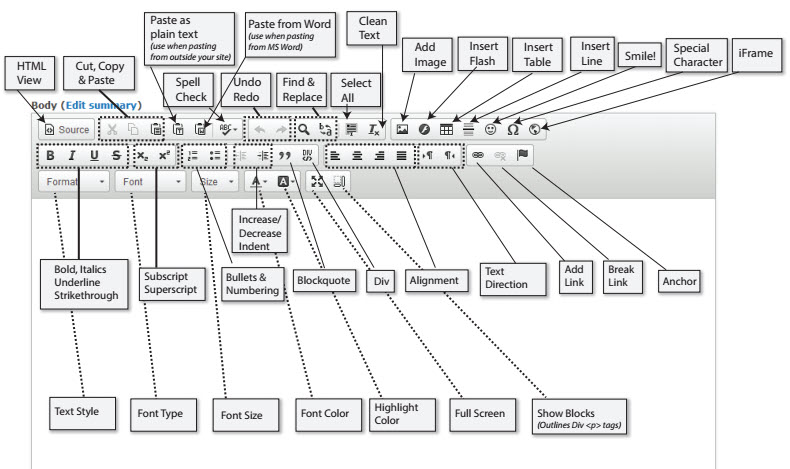
Body: Use the built-in WYSIWYG editor to add text, images, links, and any type of content you would like to create. Not familiar with the icons? Review our "WYSIWYG Editor Key" by viewing the photo at the bottom of the page.
-
Text Format: By default will be set to ‘Full HTML’ but you have options to change it to:
-
Full HTML
-
Filtered HTML
-
Rich Text Editing
-
Plain Text
-
Books: Enter the Product ISBN, SKU or Model to add it to the published page. You can also incorporate reviews at this time. If you want to add more than one item click the ‘Add Another Item’ button.
-
Files: Add files in txt doc docx xls xlsx pdf ppt pptx pps ppsx odt ods odp formats to your site.
-
Menu Settings: If you would like your page to be a clickable link in a menu, select ‘Provide a menu link’ and fill out the fields in this section.
-
Menu link title: What text do you want to display in the menu bar?
-
Description: Will display when the link is hovered over.
-
Parent item: What section is the page going to be referenced under?
-
If it is a top level item, select the title of the menu. If it is a sub-category, select the item that will house the page. Menu titles are always surrounded by greater than and less than symbols, for instance <Primary Links>. Example: “About Us” would be the parent item for “Store Hours”, but "About Us" would have <Primary Links> as the parent item.
-
Weight (optional): Where do you want the link to be located. The smaller the number, the farther to the top or left. If the number is higher, it will fall lower or more to the right (depending if you have a vertical or a horizontal menu).
-
Authoring Information: The timestamp & user account associated with the page.
-
Meta tags: If you want to customize the meta tags you may make changes here, we recommend leaving it to the default.
-
URL Path settings: We highly recommend using the ‘Generate automatic URL alias’ option. However, if you'd like to make the web address of your page something specific, enter the address in the provided field.
-
Revision Information: If you would like to create a new copy of a page, instead of overwriting your existing content.
-
Book Outline: Can be used to create a Table of Contents. Anything associated with a book will have automatically generated links to the prior and next topic in the book.
-
Publishing Options: - Is the page ready to go live?
-
Sticky at Top of List: This will place your page at the very top of the front page, regardless of how old the page is. If you use this option on more than one page, they will display in date order.
-
Promoted to Front Page: This will move your page to your ‘Front’ page or landing page.
-
Published: Anyone who visits this page can access the information.
-
Preview: Preview your page before save it
-
Save: Save and publish your page.
You have now created your page. If you did not place it in a menu during setup you may do so now by visiting Structure > Menus > Menu of choice and adding it appropriately. Otherwise, your page is created and published.

